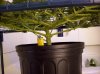
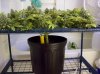
DWC bubbler with integral SCROG
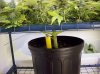
A combined DWC tub and SCROG screen for a single plant.
[FONT=arial,helvetica,sans-serif]
What you will need
[/FONT]
- [FONT=arial,helvetica,sans-serif] Light proof tub with well fitting lid (at least 20ltr capacity)[/FONT]
- [FONT=arial,helvetica,sans-serif] 20mm pvc pipe for scrog frame (i used a total of 5x1m lengths)[/FONT]
- [FONT=arial,helvetica,sans-serif] 4 x 90deg fittings (to suit pipe)[/FONT]
- [FONT=arial,helvetica,sans-serif] 4 x 45deg fittings[/FONT]
- [FONT=arial,helvetica,sans-serif] 4 x 'T' fittings[/FONT]
- [FONT=arial,helvetica,sans-serif] 4 x end caps[/FONT]
- [FONT=arial,helvetica,sans-serif] Welded wire mesh fencing material (pref plastic coated, 50mm square spacing)[/FONT]
- [FONT=arial,helvetica,sans-serif] Anti fungal silicone sealant[/FONT]
- [FONT=arial,helvetica,sans-serif] pvc glue[/FONT]
- [FONT=arial,helvetica,sans-serif] net pot (4" or 6")[/FONT]
- [FONT=arial,helvetica,sans-serif] air hose and air stones (and air pump of course)[/FONT]
- [FONT=arial,helvetica,sans-serif] time (approx 4hrs if all materials present)[/FONT]
[FONT=arial,helvetica,sans-serif]
Background
This DWC/SCROG is based on a thread i sa[/FONT]
[FONT=arial,helvetica,sans-serif]
w on overgrow so i don't want to claim it is my design, just my interpretation of it. i don't remember the author, so i can't give them their due credits, but thanks anyway to whoever it was. my grow is a small affair, consisting of 2 plants under a 600W hps (in flower), with a total SCROG area of 900mm x 900m[/FONT]
[FONT=arial,helvetica,sans-serif]
m. this means that manual water changes are not too difficult so i didn't bother with a re-circulating system.
Important note - Since these screens have been made I have done a few small alterations to the way they look in the photos which will be explained later in the article[/FONT]
[FONT=arial,helvetica,sans-serif]
To begin with i sorted [/FONT][FONT=arial,helvetica,sans-serif]
out the crate/bucket[/FONT]
[FONT=arial,helvetica,sans-serif]
This was a 25 ltr crate from bunnings. it is black in the body but unfortunately the lids they had to fit them were almost totally transparent, so i had to spray them to try to make them more light proof..[/FONT]
[FONT=arial,helvetica,sans-serif]
Note - This is one of the aspects of the design that i have changed since construction. i found that the flat white paint on the lid was not as light proof as it could have been so i covered the lid in black gaffer tape subsequent to construction.
I then cut a hole in the lid to accommodate the net pot. same old story, make the hole a little smaller than the net pot so that the lip at the top of the pot rests on the top surface of the lid.
Next i made four holes, equally spaced in from the corners. i use 20mm pvc pressure pipe for the construction of the SCROG screen (available at bunnings, including all manner of fittings to suit). the name "20mm pvc pipe" is deceiving, i think that is an internal diameter of the pipe because the outside diameter is nearly 25mm so the holes were drilled at 25mm.
[/FONT]
[FONT=arial,helvetica,sans-serif]
The next holes are drilled into the body of the crate itself and are to allow the air lines for the air-stones to pass into the DWC. these should be drilled to almost exactly the same diameter of the airline that you will be using, this will create a snug hold around the airlines and prevent any light leaks into the DWC or minor water leaks out of it.[/FONT]
[FONT=arial,helvetica,sans-serif][/FONT]
[FONT=arial,helvetica,sans-serif]
Next job was to cut the airlines to go from the pump to the air-stones to the required length and install the air lines through the holes i drilled earlier.[/FONT]
[FONT=arial,helvetica,sans-serif]
The SCROG screen
These are the fittings that are required for the SCROG
[/FONT]
[FONT=arial,helvetica,sans-serif]
4 x 90 deg fittings
4 x 'T' fittings
4 x 45 deg fittings
4 x end caps[/FONT]
[FONT=arial,helvetica,sans-serif]
There are only a few critical dimensions in the construction of the screen, the spacing between the holes in your lid to allow the vertical legs of the SCROG to pass through, the height of your screen from the lid of your DWC bucket and the overall dimension of the finished screen (to suit your growspace).
With this in mind i cut the lengths of pvc required to achieve these dimensions. this should be self explanatory once you see the pictures. however it is not worth giving dimensions here as it depends on the size of your DWC, your overall desired screen size etc.[/FONT]
[FONT=arial,helvetica,sans-serif]
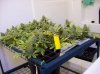
Next i made the wings of the frame. these project out from either side of the core structure and can be made as wide as is needed to suit your grow space/light intensity. the length of the 2 end pipes of the frame (running vertically in the photo) dictate the overall width of the finished screen.[/FONT]
[FONT=arial,helvetica,sans-serif][/FONT]
[FONT=arial,helvetica,sans-serif]
Subsequently, i built the 2 halves of the core structure. these consist of 2 'T' fittings joined by a length of pvc.
(please note that in the photo i have already attached the wings of the screen to one half of the core structure. it is advised to make the core structure parts independently so that the 2 'T' pieces can be lined up with eachother prior to attaching the wings.)[/FONT]
[FONT=arial,helvetica,sans-serif][/FONT]
[FONT=arial,helvetica,sans-serif]
This length of pvc that joins the two 'T' pieces is determined by the distance between the holes in your DWC lid and should be cut so that the pipes that project from the vertical part of the 'T' fitting are the same separation as the holes in the lid.
once you have the 2 core structure assemblies and the 2 wing ends of the SCROG it is time to assemble the frame.[/FONT]
[FONT=arial,helvetica,sans-serif][/FONT]
[FONT=arial,helvetica,sans-serif]
It is important at this stage to fix the core structure assemblies to the wings so that the projections from the 'T' pieces stick out at a 45 deg angle from the overall plane of the screen. then these projecting pieces from the 'T' are cut to a length so that they also line up with the the holes in the DWC lid.
Once they are cut to length, place a 45 deg angle fitting to the end of each projection. this means that all of the legs of the screen will sit in a vertical orientation and line up with the holes in the DWC lid.[/FONT]
[FONT=arial,helvetica,sans-serif][/FONT]
[FONT=arial,helvetica,sans-serif]
However, before attaching the legs to the screen assembly, it is advised to attach the mesh to the frame.
[/FONT]
[FONT=arial,helvetica,sans-serif]
[/FONT]
[FONT=arial,helvetica,sans-serif]
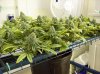
For the mesh i used a 'welded wire mesh' fencing product from bunnings. it comes in rolls 900mm wide so it is the perfect width for my 900mm x 450mm screen. this mesh comes in plastic coated version which is the one i used and the hole size of the mesh is 50mm x 50mm
I used the small cut offs that were left on the end of the roll as small twist ties to attach the mesh to the frame.
After fixing the mesh to the screens, it is time to attach the legs to the frame. the legs should be cut to a length so that when they are put through the holes in the lid and are resting on the floor of the DWC bucket, the SCROG screen should be about 200mm - 250mm above the lid.[/FONT]
[FONT=arial,helvetica,sans-serif][/FONT]
[FONT=arial,helvetica,sans-serif]
Having put the legs through the holes in the lid, i recommend that the ends of the legs are closed off with 'end cap' fittings. this is an additional feature that i don't have a photo for, but i decided on adding the end caps after suffering a bout of root rot. with the end caps fitted to the legs, none of the nutrient solution enters the inside of the frame and to clean the frame you simply have to clean the external surfaces of the legs. (when fitting the end caps you must drill a small hole somewhere discreet on the upper part of the frame so as not to compress the air within the frame when fitting the final leg end cap.)
When the end caps are fitted you should put the lid/SCROG assembly in position, in the DWC bucket as in the photo above, and ensure that the lid is fully pushed own home onto the bucket. this means that the lid is set at the correct height on the legs of the screen and the weight of the screen is supported on it's legs.
Now you can fix the lid to the legs by applying a good thick fillet bead of bathroom (anti fungal) silicone sealant around each leg.[/FONT]
[FONT=arial,helvetica,sans-serif]
It is important to let this first lot of sealant, on the upper surface of the lid, to dry and adhere overnight. then, the next day you can invert the whole assembly and apply a second lot of sealant on the underside of the lid.[/FONT]
[FONT=arial,helvetica,sans-serif][/FONT]
[FONT=arial,helvetica,sans-serif]
Once this has dried it will ensure that the lid is fixed to the screen at the perfect height.
and well, that is pretty much it. the net pots can be inserted into the holes in the lid, put the whole thing together and put it in the grow room[/FONT]
[FONT=arial,helvetica,sans-serif][/FONT]
[FONT=arial,helvetica,sans-serif]written by [/FONT][FONT=arial,helvetica,sans-serif]Jaguarrh[/FONT]
[FONT=arial,helvetica,sans-serif]editor: Pure[/FONT]