heydiddlydoo
Member
Thanks for the heads up.Just something down to road to be aware. Not sure if this is your first time using a tent but you may end up having temp / humidity issues as the plants get bigger. Do you have ac in the room and a fire extinguisher? Fire balls?
- Yes, I do have AC. The tent sees an average air temp of 75-76 when I am home AC on, and 81 when I leave the house on a hot summer day and leave the AC off. It gets to around 77% RH inside the tent when I get home from work.
I can add-in a smoke detector that activates the water pump and sprays water inside the tent. That way, when I am not home and if the tent catches on fire I am safe. To be extra safe, I will look into the price of the fire extinguisher balls see if I can find one under $50. I look around online and saw a vast price fluctuation.
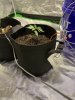
Heads up: If you buy Capacitive Soil Moisture sensors, many of them are built poorly and there are vast QC issues at the moment. For some reason I was getting bad readings from my moisture sensors inside my seedling Blue Gelato soil. After troubleshooting, checking wire terminations, and ensuring my wiring was correct, I researched online and found out that soil moisture sensors are often faulty due to manufacturers not ensuring to include either a) the voltage regulator b) not using the right timer chip and cheaping out, or c) not drilling the PCB correctly where the resistors are.
I had 5 new sensors from my last order, and found two that work well. Now that I got my soil moisture sensors calibrated I can relax and just fill the water bucket once every 2 weeks, and the automated system takes care of the rest. My lights are on a scheduler, including my two fans. I run my grow light (Mars Hydro TS600W) 10:30pm to 4:30pm daily and same for the clip-on circulation fan. The inline fan is also on it's own schedule.
This video explains why soil moisture sensors often sold for R Pis or Arduinos fail - Link Below
Capacitive Soil Moisture Sensors *Why 82% faulty* and How To Buy Good Ones!
 Complete